Thursday, February 6, 2014

Time is distance


Ever since I was  kid, I always wondered why folks use time to tell distance. It's about 60 miles to Portland from here but if you were to ask anyone, they would say "It's about an hour and a half away." The store down the road is "only a few minutes from here".  The last job I did in Penna. was about 7 miles from my house. It took about 40 minutes to get there.  When I moved to New Hampshire, my first job was almost exactly the same distance, 7 miles. But it was only about a fifteen minute ride. So even though each were the same distance away from my home, I would say that one was 40 minutes away and the other fifteen minutes away. Of course we all know why. There were no less than a dozen red lights and lines of traffic in Penna. And the N.H. run was a straight run on a 55 mph highway. In fact when I first moved to N.H., there were no lights within a 45 minute ride of home in N.H. (that's about 30 some miles) And trying to funnel all that traffic through all those interchanges in Penna. was like moving a lot of water through a small diameter pipe. It just doesn't get done quickly.

So what does this all have to do with modeling? Absolutely nothing. But it does say something about how we think. Our time is valuable to us. And we would rather see distance in terms of the time it takes to go from one place to another than on the actual measure we have relegated to distance. Our perception of time takes precedence over distance. OK, enough thinking out loud, now to the models.


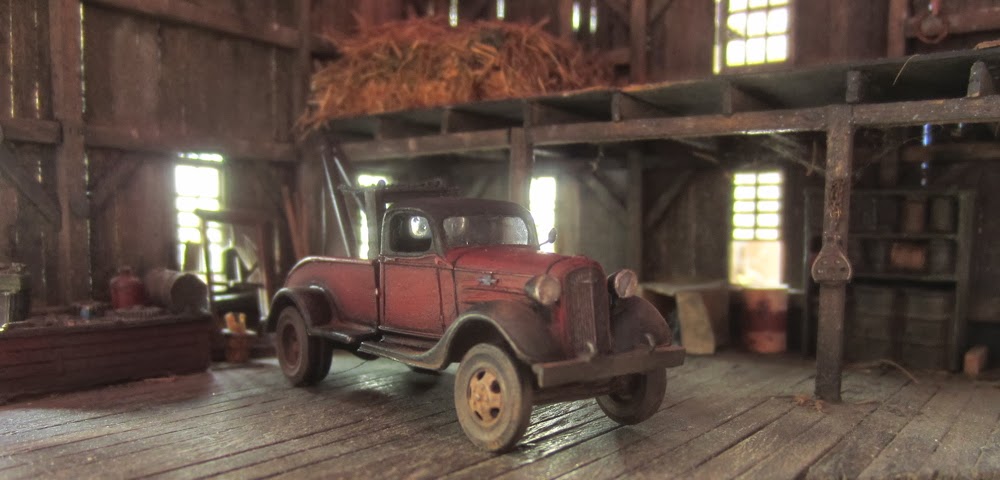
I've mentioned the Athearn vehicles in kit form before and picked up another of the Ford F850 kits. I used the Athearn frame and placed the Boley roll back wrecker unit on it. That's basically it except for the paint and weathering. The 'advanced design' Chevy pickup (1949-54) is from Busch and I replaced the wheels with plain steel rims from Jordan.


Next piece I did was another quick, down and dirty model with not a lot of fanfare. I chose the Sylvan Scale '37 Chevy panel truck. Aside from putting the plain steel wheels from Jordan on it, fitting an acrylic windshield and of course the finish, there's no change to the model as it comes in the kit from  Sylvan. The last photo of this truck has some 'photoshop' type effects that I thought made it look like a hand painted post card.


This last one has become a favorite. It's the first of Clare Gilbert's (Sylvan) 1936 Chevy trucks that I have done. I scratch built the wrecker unit and the bed for it. The wheels are from Jordan again. I jacked the cab and body up slightly to give the truck a bit more aggressive stance.


So a little trip back in time (how far is that?) for this posting. Thanks for taking the time to visit and no matter how far away in time or distance your loved one's are, reach out and give them a call.

Friday, November 22, 2013

New completions


Again I come short of a good title but you get the message.  Just a few trucks that I don't believe I've shown here before and a little description of each. The rather sinister looking Mack Granite SBA dump is a rebuild using two different dumps. The cab is the resin model made to be used with a Herpa/Promotex Mack CH as a donor vehicle. I did use the 'glass' and interior from the Herpa piece but the rest is from a variety of sources. Prominent is the terrific dump bed that is a resin copy of a scratch built bed of Joe Enriquez that he was kind enough to give me along with the fuel tanks. The frame is scratch built with Dennis Aust suspension and wheels along with the lift axle.


I took some liberties with this next truck. This is one of Ralph Ratcliffe's jewels, the Brockway 758. I had a Matchbox dump body that came from the Dodge they put out which happens to be one of the few actual 1/87 scale models done by Matchbox. Well, I've never really seen a Brockway rock truck before in an all wheel drive and have no idea if any were ever made. But there is one in 1/87 now anyway.  Most everything I used was from the parts box so I have no idea what the origin of most of it is. Suffice it to say that my regard for prototypical accuracy went right out the window with this one. But I like it.


   Then there was this little Wiking piece. What is referred to as the International Loadstar COE and/or the Cargostar, depending on who you talk to was produced in the late 60's. I bought some Wiking models for a train layout I started when my boys were little to augment some Wiking vehicles I bought when I was 13 years old. So this model has been with me for about 30 years. I placed the Wiking cab on a Roco chassis from their long ago discontinued civilian line of vehicles. The flat bed is scratch built and the stake sides are from the parts box. The wheels are from an Athearn Ford C cab with tires from an Imex piece.


 Curiously I'm not sure about the John Deere tractor. I'm guessing an Innovative Designs piece but I could be wrong. It is a cast metal kit. This is what happens when you get old.
   So as we approach Thanksgiving next week, I'd like to wish you all a happy day. I hope you all are fortunate enough to be with all the one's you love.

Saturday, November 2, 2013

Basic Airbrush


    This is merely an introduction to airbrush use. It will be by no means, a comprehensive step by step that will make you an expert (certainly I, am not).  Many fear the thoughts of changing the way they model. The introduction of a new technique or material creates skepticism among many. I personally have a deep skepticism towards the 3D printing technique we are seeing today since most of what I am seeing is grainy and lacks detail in our scale. But I applaud those trying it as they will be the pioneers that I'm sure will eventually overcome the pitfalls we are seeing in these models today. So in fact, quite a few have that same skepticism towards using an airbrush to produce finishes on their models. They believe they have been doing OK so far and why change? Well think for a moment on models that are hand painted or painted with a spray can. I have seen what appear to be great models at a distance only to be thoroughly disappointed when seen in up close photos or particularly in person. Imagine the thickness of the paint on a real car that you are viewing in scale. Would you ever see a one inch thick paint job on a vehicle in real life? No, and yet I see models, and even videos of models being painted that represent exactly that. You've purchased a great casting from a reputable model company that has wonderful details on it. And when painted, you ask yourself "where did the details go?" Try as I may, I have never been able to accomplish a finish paint job using a spray can that can compare to that of an airbrush. And then there are those finishes that can never be done without the airbrush. Try hand brushing a lacquer. Or laying down an impeccable Alclad 2 finish without an airbrush. It's virtually impossible and even if it could be done, the airbrush makes it so easy, why bother any other way?
   Lastly, of the reasons many don't want to use an airbrush is the cost. Yes, I have spent much on my Badger which is a great tool. But honestly, my everyday workhorse is the cheap $20 airbrush I purchased at WalMart that was made for them by Aztec. It is a single action "Plain Jane" that is simple to use, clean and maintain. OK enough of the reasons why you should make the switch, now for a few very simple basics.
   I shoot mostly solvent based paints like Floquil and Testors but on occasion, like to use lacquers and acrylics. The solvent based paints are very simple to use right from the bottle and a one ounce bottle can last for a dozen models. I do not use the rather expensive thinners offered by the manufacturers for these since I can use regular turpentine or paint thinner bought at the hardware store at a substantial savings. I often shoot directly from the bottle without thinning depending on the viscosity of the paint. For any kind of paint, it should be the consistency of whole milk. When you swirl the paint around in the paint cup, it should cling to the sides but be translucent as it slides back down to the bottom of the cup. I thin and clean the airbrush with the above mentioned thinners. I should at this point mention that I often take spray can paints and decant them into my paint cup with a straw. None of them ever needed thinning as they are meant to be sprayed anyway.  After I'm finished painting, I run clear clean thinner through the brush, disassemble the cup and head from the air line and simply wipe any excess from the parts. In over ten years, with the current brushes I have, I have never completely disassembled an airbrush to clean them and they are all still in good working order.  If it looks like I have a lot of build up of dried paint anywhere, I simply drop everything in a tin full of lacquer thinner for a few hours and everything comes out looking like new.


   The Mack Vision above is example of an automotive lacquer.  Lacquers are equally as easy and the same rules apply for viscosity and cleaning except to substitute lacquer thinner for the thinning and cleaning process. Nail polish fall into this category too and the colors available there are amazing. I often go to the cosmetic counter where a basket of bottles of nail polish that don't sell well for fingernails will be as cheap as 2 for a dollar.  The only draw back to lacquers is their propensity to dry too quickly coming out of the airbrush. Sometimes it will give a gritty look to a model as the paint droplets in the spray actually dry before they hit the model. The solution to that is to cut down the distance from the airbrush to the model. Drying in the orifice of the airbrush can also be a problem but thinning a paint further usually fixes that.


   Acrylics behave similarly to lacquers in that they dry very fast and pose the same issues as lacquers. My opinion is that one needs to use good acrylic paint for the airbrush and don't go with the cheap craft paints like Apple Barrel and Folk Art. They have their place but not in the airbrush. My favorite in acrylics is the line produced by Vallejo which is what I used on the F850 above.  I thin acrylics for the airbrush with Windex. And clean my airbrush with windshield washer fluid that can be bought by the gallon cheaply. One note, when I clean my airbrush after shooting acrylics, I wait a few minutes and then shoot some lacquer thinner through as well. Sometimes there is a chalky residue leftover from acrylics I want rid of.


     I took a bunch of PVC campaign signs down from the road after an election that I use to test spray before I actually move on to the model. This gives me a good idea of what's coming out of the airbrush given the paint I am using, the distance I am spraying and the coverage I'm getting. This will tell you a lot about how that model will take your paint. I first mist the model with what I call a tack coat. Almost no color is going on the model but enough to cover all areas so no bare plastic, metal or whatever material you are spraying is showing. When that is thoroughly dry, I go on to lay down a coat of paint. Many times, one coat is sufficient. The way I paint is always a two phase project. I will always do a base coat whether it is a primer for plastic over which I will be doing a lacquer. Or a base coat of a dark brown. The reason for the darker color is that I use very little finish color over it and it allows panel lines and details to pop out. You see, in this scale, details are so small that they will be obscured by heavy painting and cast no significant shadow to belay their existence. So what I do for painting is to strive for as realistic a look as though it were a real vehicle. No one inch thick paint jobs even if there are multiple layers/colors being used. I have resorted to even merely misting my models with the finish coat to just give a hint of the color being used. This is just not possible with a spray can. And holding the can far away with the hope of getting less on the model, usually results in the grainy look I described earlier or not enough coverage.
   With the airbrush, I have never had some of the conflicts of the spray can use like orange peel finishes or runs and drips. The airbrush process is just so much easier to control. So go ahead, buy a cheap airbrush and give it a whirl. Experiment with all kinds of paints since your experimentation will yield much more information than I could ever hope to give you. And don't wait another day to tell your loved one's you care.


Thursday, October 24, 2013

Autumn

I usually have an aversion to this season, the harbinger of the season that comes after it every year. There's putting up the firewood I've worked on all summer, and swapping the screens for the storm windows (yes, I still do it the old fashioned way) and of course throwing more clothes on than I'm comfortable with. Then there's raking the leaves and....... well, you get the picture. But this year I have the pleasure of seeing the Red Sox in the Fall classic. But then again, my television watching will come to an end with the loss of the 5 or 6 baseball games every week. This is a mixed blessing. It moves me onto the workbench and gets the creative juices going. Lots of unfinished models sitting in the shelves this year that I hope I can finish.
    The model above is the Jordan Miniatures 1922 Packard truck. As I worked on it, I kept thinking about how detailed the chassis is and what a shame it is to keep covering it with the flatbeds, tanker bodies and such that I use to build a complete truck. So I decided, at least for now, to leave it as is and perhaps put it on the back of a more modern truck trailer as a load. I left the cab off as well to view the interior and tried to replicate the Packard Single Six engine for this model. My weathering techniques were the same as I do on a lot of older well used vehicles and I am pleased with the outcome.


I got lazy too with the Model TT, also from Jordan here. That is, I didn't spend a lot of time fabricating an interesting body configuration. I merely put the flat bed of the kit, which usually has wooden stake sides and cut down the wood stake sides from the Athearn Ford F850 kit on the deck. It has good detail and was an easy, quick body.


   I did do something a little out of the ordinary here though. After painting the model with my typical first coat of Floquil RR Tie Brown, I stained it with India ink, slightly thinned with alcohol. The results were that a bit of the brown showed through. All this followed by a wash of Burnt Umber and some colored artists chalks. I thought the metal work came out pretty good here.


This next piece did require a bit of work. I started with the awful Imex Peterbilt. First thing I do with these is file out the terribly thick glazing on the windshield. I then ground the nose flat and built a radiator shroud and grille from styrene and corrugated roofing.

  
  I used the Alcoa wheels that came with the Don Mills Mack LTL kit on the Imex wheels. The red paint is a Mazda automotive lacquer. I picked up a dump bed from Ralph Ratcliffe at the Springfield show last year and have been dying to use it and it fit the wheelbase of this truck perfectly.


   Some diamond plate steps, fuel tank and some lights from a Jordan kit finished this shiny Pete up.
Well this is going to be a short one since I hear they are getting ready for the first pitch against the Cards on the TV in the next room so thanks for looking and have a great Autumn.

Friday, August 9, 2013

Now this is a big Mack


 A real quick entry here for my latest attempt. This is a resin kit from Ralph Ratcliffe of the Mack M65 off road quarry truck. This 65 ton rated monster is a beast and it dwarfs other pieces in the scale, even the Mack FCSW in my last photo which is in itself quite a large truck.


Ralph's kit is simply amazing. The fit of all the pieces is just perfect and I especially like the addition of brass rod in the wheel area to give a much more stable  point upon which to fasten the wheel/tire combination. Wheels and tires are cast separately by the way so painting is easier. The only thing not included in the kit is the acrylic windshield.


Detail is not lacking either from the diamond plate cast into the deck area of the fenders and hose clamps for the air cleaners to the bulldog rad cap. Castings are crisp, clean and smooth. After assembly which went very fast, to finish the beast, I painted the model in my typical RR tie brown Floquil paint. I don't know what I'll use when my supply runs out as Floquil has stopped production. This was followed by a coat of Future Floor Finish and all was allowed to cure for a day. It was then time for the finish coat of Floquil UP Armour yellow, a favorite of mine. It should be noted that this color is a perfect match for the older Cat yellow.  The weathering consists of a good scrub with Windex, particularly in the bed interior to remove the yellow finish coat. This "chips" the paint away since the Windex dissolves the Future undercoat and leaves the brown show. This time around I did the panel wash with India Ink diluted with alcohol followed by a flat clear lacquer. Then an acrylic wash with burnt sienna was used and allowed to dry well. Only the undercarriage, dump bed, wheels and tires then got a wash of raw sienna and I used some ground artists chalks sprinkled here and there while still wet in some specific areas. And finally I used a product found in any craft store called RubnBuff on the dump bed interior. I just brushed some on and rubbed it out to give the worn to the bare metal look.


   I'm really pleased with the way this model finished but certainly could not have had the same results if it weren't for the terrific way this kit was produced by Ralph. Oh, that's a real Mack bulldog in the last photo. Thanks for looking and say a prayer for our lost loved one's.