Friday, December 10, 2010

Winter is upon us


And with it comes the dreaded four letter word here in the north country - Snow. Managing the highways of our white landscape has always been a challenge and expense. Surprisingly, much hasn't changed in the way we uncover the asphalt over the years. In doing my research, I've noticed that the highway snow removal truck, while changing in models from year to year, still use the plow to scrape up and push the snow to the side. And so the truck shown here could very well have been outfitted the same as those used several years before and many years after it. The model shown is a 1953 Oshkosh with the Comfo-Vision cab. The body style much resembles the FWD contribution of the same vintage. It is offered in the scale as a solid resin cab from Sheepscot Scale. I used the Sheepscot chassis and wheels also here but the rear wheel differential and spring combination come from Ralph Ratcliffe. The front push frame is mostly styrene. I've been using several different solvent glues for plastic. Good old Testors plastic cement is my choice for Evergreen styrene to Evergreen styrene but when using the Plastruct products I switch to Bondene. It works well for several manufacturers plastic. For instant bonds on styrene, Tenax 7 is another favorite. The light grey plastic on the wing push frame is from a Tichy coal chute kit.


You might notice that the wheels are darkened. They have no paint to hide detail on them but have been treated with a combination of Hydrogen Peroxide and Muriatic Acid (20/80 mix respectively). This solution darkens most pot metals to the color shown. A fuel tank from the parts box was added and all was painted Poly-Scale RR tie brown.


The cab was also painted in the RR tie brown and then a coat of Floquil UP Armor yellow was sprayed. Mirrors and headlamps were added and the chrome work was done. A small resin dump body from Sylvan Scale was painted black and wooden scuff boards were applied.


All of the chassis and push frame had a coat of dirty brush thinner mixed with engine black put on and while still wet were blown with the airbrush with no paint. The rotating beacon is cast metal with a drop of food coloring mixed with wood glue for the lens. The entire model was then washed with acrylic burnt umber and Windex.
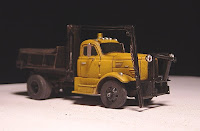


Finally the chalks came out along with the wood glue and food coloring for lenses to finish the model. For all the measurements and angles needed to make this as prototypically correct I used the sheet provided by Sheepscot for building the Frink snowplow. I hope to add the plows to this truck eventually but thought it looked good sans plow. Now if I can only get one more winter out of my old snow blower.


Tuesday, October 19, 2010

I love big Macks


With a large order of fries to go please. These resin castings of Ralph Ratcliffe make for such a decent model. They are so precise and crisp in detail and proportion. And Ralph seems to be expanding his line quite frequently. This truck was a challenge. There aren't a lot of them out on the road. And when you do see them, they are DOT snow plows. Well I just wasn't into a snow plow and I saw a photo of a septic tank delivery truck that was an RM Mack. Mine hasn't been relegated to any particular duty yet but I just had to do something with these very cool equipment tires for some of the photographs.The build was simple in terms of the cab and chassis. The Kibri Unimog lent itself for four wheel drive in a large truck capability. I added the step tank on the driver side and hydraulic controls just behind for working the gantry travel which is a three stage telescoping ram. The road side has two steps and a bar step added and the tool/chain box under the bed.


The exhaust is a piece of aluminum tubing bent with a piece of heat shrink tubing for the muffler. The small electric winch is a Dennis Aust casting. A smaller rail has been added next to the boom for the electric wire to travel on as the boom is extended and withdrawn. Steel wire was used for the hydraulic lines. It bends easy but retains its shape well and holds fast when glued unlike the lead line I had been using. The wheels on the winch come from Vector Cut which I will go into detail at the end of the post here if time allows tonight.
Various steps, hooks and grabs were put on the model to try to bring it to a realistic look. The tires and planetary rims are from Roco. On the cab are stainless mirrors from Plano and the light bar from Busch. I particularly like the back of the Unimog chassis under the bed here. Oh, the license plate? New Mexico.
I broke the striping decal on the front bumper and made the cracks in it to be rusted through. Also added the guide poles to the bumper. I ran the thread for the wire through my fingers coated with moustache wax and glued them to small discs on the wire guide bar made from styrene rod sliced thin. The entire model was painted with RR tie brown in an acrylic. Then all the black you see was painted with a dirty brush thinner with a few drops of Floquil engine black and the airbrush with no paint blew the wet thinner wash. The cab was done in Floquil caboose red. All bright chrome work was done and all allowed to dry for a day. Then a black acrylic wash went on the entire model followed by a flat clear lacquer. Then a wash of burnt umber with highlights of raw umber on particular spots while the burnt umber wash was still wet. I mix food coloring with white wood glue for my amber and red lighting and just wood glue for clear lenses on the headlights. You might notice I took photos before the wood glue dried clear.


I've been asked several times to walk folks through one of my builds and I guess that was pretty painless so maybe I'll do it again sometime. Now with regard to the above mentioned Vector Cut. These folks are laser cutting on mat board some of the finest and most highly detailed pieces in 1/87. I have purchased the tool selection with spanner wrenches, pliers and open end wrenches that have to be seen in person to appreciate. I also bought their wheel card, and a card with engine parts like gaskets, fans and fan belts. But the most impressive is the card with a junk yard assortment that I have finished a few pieces of below. The door was covered in Bare Metal Foil and torn. I suppose I should have located the tear in a better place but the effect will be worth using somewhere.


Well this brings to an end another exciting adventure. Thanks for looking.


Tuesday, September 21, 2010

Newer yet


Geez, my imagination just runs dry when it comes to putting a title on these postings. Lord knows that if it wasn't for my wife, our four children might still be nameless. Well be that as it may, the title is at least accurate. I have managed to step into a slightly newer era in my last two pieces. The one I had the most fun with was this Mack DM which is distinct in it's offset cab. The model is a resin casting from Ralph Ratcliffe and as a matter of fact so is just about everything seen on this model. With the exception of the tractor wheels (Roco tires on Herpa rims) the battery box, fuel tanks and air cleaner are all from Ralph. As is the 25' gravel trailer he now offers in kit form. The cab is mounted on an Athearn Chassis with corrugated metal quarter fenders added. The light bar is from Busch.


And speaking of Athearn, they are now releasing the Ford F850 boom truck in kit form. Thanks to Trip Aiken at Truck Stop Models I recently acquired a kit (or two). These are nicely cast with a lot of parts so painting individual parts of the model is easier. I also have remarked before that while the Athearn factory paint, as nice as it is, can be a little heavy handed and does hide some detail on parts. This coupled with the fact that the boom and bed lend themselves to some serious kit bashing make them very attractive to modelers. I hope the trend in offering their ready to roll line in kit form continues.


OK so that's the newest yet. Hope to have more soon and thank you for visiting.

Sunday, June 20, 2010

A few new ones


Had some time to put a few new pieces together. I seem to be stuck in the 30's for some reason but it has nothing to do with depression. I just recently had a short but very nice visit by Fred Oxner and his wife and received quite a few more Roco Zis 5's so it doesn't look like I'll be getting them out of my system for a while. I have to add that I'm really itching to do something modern soon however.
But that is not the case with these latest builds. The one pictured above is the Ford Model AA by Busch that has been transformed from a van to a canopy express wagon. These were often used by fruit and vegetable hucksters. My grandfather's brother used one (an old Chevy in his case) back in the 40's and 50's that he filled in south Jersey and would serve suburban Phila. neighborhoods. It was a simple matter of cutting the van side openings and adding the roll down canvas sides. I also opened the engine compartment and use the 4 cylinder from Jordan. I should remember to dust things off before photographing them.


And now it's back to Zis 5's for the next two. As promised, I finally got to build a barrel truck for Fred and was pleased to present it to him when he visited. A pleasant surprise gift from Fred in addition to the Roco pieces was the Rio Grande cast metal mixer unit kit . A subtle message there I'm sure. The piece most recently finished utilizes the mixer barrel from SSLtd. which is also cast metal.


The last of this post is something I saw in a photo of an express truck on a historical site. The body is actually one of the body configurations that come with the Roco model. I cut the front half out and added a wood floor, interior partition and the bars int the openings. The crooked looking horizontal piece was supposed to represent a leather strap but I'm not sure it's very convincing. The rolled up canvas side curtains are tissue paper. This turned out to be a personal favorite. Been playing around with camera settings here, be forewarned, these are large files if opened (but worth it).


Thursday, May 20, 2010

Roco Zis 5, all gone.


I have mentioned the Roco/Komo model of the Zis 5 Russian truck. To quickly review, several U.S. truck manufacturers banded together in 1927 and transported all the tooling necessary to build what most closely resembled the Autocar truck of the day. The model is a good representation of U.S. trucks spanning almost a decade. It sold originally for around $5.00 but recently has seen prices break the $30.00 mark, NIB. I have been asked if there existed a place where one could see all the variants of this model I have created so here 'ya go. My first Zis (above) was just a paint job.


Because the first few that I bought were rather cheap (I remember first paying around $6 each) I used them to practice thing like weathering. The one above was just that, with a bare chassis I tried out several rust techniques. I was really pleased with the way this turned out.


More rust with a simple wooden flatbed and gas engine powered pump for a load


The two above are attempts at making the Zis 5 a highway tractor. In both instances, it was simply a matter of adding a fifth wheel. The flatdeck trailer with the granite block load is scratch built from wood and styrene. The lowboy is a cast metal and wood kit from Rio Grande. It is hauling a Bucyrus Erie steam shovel crawler from Vintage Vehicles. Now newly released by Jordan Miniatures. Please don't hesitate to click on the photos for enlarged versions.


I've gone through a period of making tow trucks. The tow units on these are made from styrene and watch parts.


Then I really became intrigued with the whole boom/cable thing. I saw this set up on a historical website from Wisconsin. It's a telephone pole/piling setting truck. The unique feature on this truck is that the cable goes under the bed of the truck from the winch to a sheave in the front of the bed and then up to the boom sheave. This is all made from styrene and watch parts.


I should mention now a very nice man by the name of Fred Oxner, who has been buying many of my trucks. Fred was kind enough to send me several of the Zis 5's that you see here. Many thanks to Fred, may he live long and enjoy his models. Fred has wanted one of these barrel trucks since I first built this green one but I haven't been able to get the parts together yet. I have not forgotten Fred! The mixer unit on the back here is modified to fit the truck from a cast metal kit by Rio Grande Models.


I had to give the open door trick a try and came up with the mini scene above with the driver inspecting what the bump was. Surprise! The skunk is a piece of painted brass foil. After seeing it, I had a request for another stake bodied truck which is what you see on the right. Both sport the stake bed from Jordan that comes with their Model TT Ford.


Not done yet with these. Jordan has this great little tanker unit that comes with the Model AA Ford. Couldn't resist the opportunity to pair it up with the Zis for the kerosene truck. And the tanker unit on the yellow one in the middle, is a resin casting made specifically for the Zis 5 by a Czech company. This was another chance to use a weathering technique. That of chipped paint. The third all red tanker was a scratch built thing with brass foil stretched over a wooden dowel.


The last I have to show is made from one of the bed configurations that come with the original model. It's a wood sided bed with a canvas top. I cut one of the sides to the open position, discarded the plastic canvas and made hoops and a canvas top from tissue paper. I imagine it as a vegetable hucksters truck.

Well that's my affair with the Roco Zis 5 so far. I hope to have more. I suppose it's apparent that I like modeling it. Thanks for looking.

Saturday, March 13, 2010

Where the heck have I been?


Well I've been right here at home in Maine for the past few months but personal life has taken me through a few detours from my modeling. First and most important is that my wife has undergone a major surgery and I had to make some changes in schedule. Cleaning house, preparing meals and general care giving has replaced sitting at my model bench and the computer. To set minds at ease, my wife is recovering well and will be back to her energetic and active self quite soon. The other chief reason for my hiatus is the lack of heat in my office/work area. Trying to model in 1/87 scale is next to impossible when shivering from the invasive Maine winter cold. My solutions to this have been temporary and expensive. OK, so much for my excuse list and now on to what I have been able to accomplish.


I was able to complete the module for the Springfield show and got some terrific response to it at the show. It was great to meet and speak with all those there and discuss 1/87 scale modeling for the three days. I added a small rural gas station to the module which is constructed of the same Evergreen styrene clapboard as the farm house. I would invite you to view some photos of it as it was displayed at the show on the new Route 87 web site that was created to give modelers a chance to participate in this endeavor. Many thanks to Andy Madden for his work on this site.


I've had a figure of a lady carrying laundry for quite some time and had to work her into a scene so I made a clothes line and some hanging wash for the back of the farmhouse. The shirt and pants are painted tissue paper. There were several new vehicles made that I placed on the diorama that include a Model AA wrecker with a little more accurate version of the Weaver Auto Crane than what I have done before. This is of course the Jordan Ford as the base model. I also built a wrecker bed and wrecker unit for the Sylvan '47 Ford cab over out of styrene. And lastly, what would any respectable farm be without a decent truck for hay, grain or livestock transport? For this I used the Sylvan '50 Chevy cab over with a metal sided body suitable for any of these duties. I went to my model building friend Ralph Ratcliffe for the great set of wheels for this model.


Aside from all that, there are some pieces on the workbench ready to be finished and lots of unbuilt kits sitting in the shelves at the moment. Hopefully with the advent of warmer weather I will be back in full swing soon. Thanks to all who have written with their concerns and well wishes. More to come.....